OnionMail


What is OnionMail

OnionMail is an open source SMTP/POP3 compatible mail server with some functions designed for Tor hidden services. OnionMail use filesystem cryptography and some extended functions. This server also allows you to use the email in the tor network without losing the ability to communicate with the Internet.

«In the future, maybe we will implement the anonymous coffee!
Today, only OnionMail
😉 »


OnionMail functions:

  • Multiple instances of server. (multiple indipendent hidden services).
  • Native PGP integration for subscriprion and server`s message.
  • Subscription via PGP encrypted email.
  • VMAT Protocol (can use normal mail address without .onion).
  • SSL cryptography by default. (STARTTLS 2048 bits)
  • Multiple encryption everywhere, RSA + AES +  RSA + AES with salt.
  • Support unicode password (UTF-8 password and 2048 bits keyfiles).
  • Inhibition of store any message in relay server.
    (Only direct connection is allowed without multiple connections).
  • Metadata protection. NSA or GCHQ can’t read your metadata.
  • SMTP Compatibility.
  • Internet normal email compatibility.
  • AntiSpam, blacklist and realtime filters.
  • Decentralized trust system for SSL certificate and public keys and exit list.
  • Native mailing list support.
  • Garbage collector to remove automatically old messages.
  • Clock and time zone spoofing.
  • Server services and operations:
    Add / Remove mail address or mail server in blacklist.
    Mailing list Subscribe / Unsubscribe.
    Request of server “rulez”. (Server help).
    (All via mail message to the server directly “server@ xyz… .onion “)
  • JAVA Implementation for all platform.
  • Native version compiled with GCJ.
  • Localhost control port and server API.
  • Protected server password and keys (optionaly not saved).
  • IP BlackList
  • Onion BlackList
  • RSA Server and Tor connection authentication.
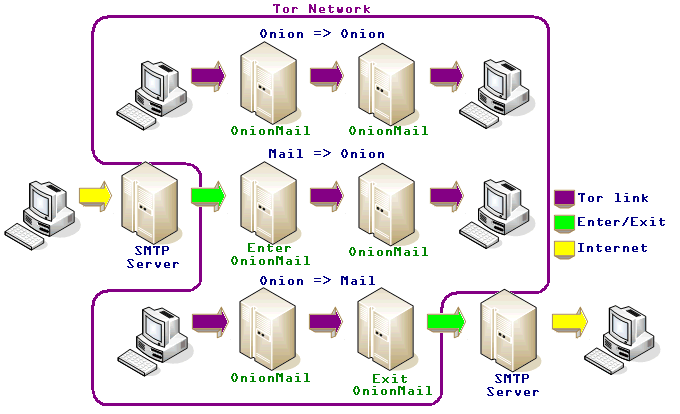
  • Connections via Tor Network.
  • Enter/Exit server to connect Tor to Internet and viceversa.
  • Statistics in csv format.
  • TorDNSLocalProxy to work with Exim4 and transprent SOCSK4A Tor Proxy.
  • Strong cryptography (RSA 2048 bits, AES 256 + AES 256 + AES 256 ).
  • Password key derivation via multiple keyfiles and passwords.
  • Deleting files with wipe by default.
  • Message headers filtering to hide informations and sigint.
  • POP3 TLS Access.
  • SMTP TLS Access.
  • User’s parameters.
  • Exit node selection to connect to internet.
  • M.A.T. Protocol to connect correctly Internet, Tor, email and OnionMail.
  • Server identification request via email to obtain the ssl certificate fingerprint.
  • Self headers rebound to verifiy the client’s mail headers and OnionMail filtering.
  • AntiSpam system.
  • And much more…..

Why OnionMail

The real question is: «Why not???».
OnionMail defends the right to confidentiality of communications.
OnionMail prevents clandestine espionage “otherwise democratic” governments.

How it works?

Usually other mail systems all mail messages pass through different SMTP servers often the connection is not encrypted.
With OnionMail the connection is always encrypted and the server does not saving data to disk. Only the recipient’s server stores the messages.

The message files into the server are encrypted with asymmetric key, which is encrypted with the password of the user and the server keys. In the event of theft, the system does not reveal any sensitive data.
It always advisable to use PGP or GPG to encrypt e-mail messages.
When a message is sent from the Internet it passes through the server Enter / Exit. These servers are the entry and exit nodes of Tor for e-mail. The user can choose which node to use to communicate to the internet.
Spam is short-lived because there are the custom blacklists. So each user can set their own spam filters.
All servers are federated to create a check system for SSL server certificates.
With systems like this X-Keyscore and similar technologies have big problems to intercept your mail messages.

Rules of Use
  • Messages with multiple recipients are allowed.
  • There aren’t Delivery Status Notification. If there are any problems email client responds with an error directly.
  • The message headers are filtered.
  • The hostname and ip addresses in the mail headers will be deleted or replaced with [0.0.0.0].
  • It compulsory to use TLS. (STARTTLS, SSL 2048 bits).
  • You can manage the Blacklist and block individual addresses or entire hidden service to block spam.
  • The messages are automatically deleted after a number of days even if unread.
  • You can request services and information to the server by sending a message to the server@xy … z.onion
  • Always follow the rules of the server. For more information please send a message with subject RULEZ to your server.
  • The SysOp, admin or root user can’t read your private email messages.
  • You can use anorma mail address via VMAT subscription to the exit/enter OnionMail server.

from here


Tor obfsproxy


https://www.torproject.org/images/tor-logo.jpg


is a network of virtual tunnels that allows people and groups to improve their privacy and security on the Internet.


Obfsproxy Icon

obfsproxy is a tool that attempts to circumvent censorship, by transforming the Tor traffic between the client and the bridge. This way, censors, who usually monitor traffic between the client and the bridge, will see innocent-looking transformed traffic instead of the actual Tor traffic.


obfsproxy diagram

obfsproxy supports multiple protocols, called pluggable transports, which specify how the traffic is transformed. For example, there might be a HTTP transport which transforms Tor traffic to look like regular HTTP traffic.

Even though obfsproxy is a separate application, completely independent from tor, it speaks to tor using an internal protocol to minimize necessary end-user configuration.

Please open a ticket on our bug tracker for any bugs you find or features you would like to see added in future releases.

Looking for obfsproxy bridges?

You can use BridgeDB to get obfsproxy bridges.

Example:

Here are your bridge relays:

  bridge obfs2 96.47.67.233:12984  
  bridge obfs2 54.247.0.43:52176

Bridge relays (or “bridges” for short) are Tor relays that aren’t listed in the main directory. Since there is no complete public list of them, even if your ISP is filtering connections to all the known Tor relays, they probably won’t be able to block all the bridges.

To use the above lines, go to Vidalia’s Network settings page, and click “My ISP blocks connections to the Tor network”. Then add each bridge address one at a time.

Configuring more than one bridge address will make your Tor connection more stable, in case some of the bridges become unreachable.

Another way to find public bridge addresses is to send mail to bridges@torproject.org with the line “get bridges” by itself in the body of the mail. However, so we can make it harder for an attacker to learn lots of bridge addresses, you must send this request from an email address at one of the following domains:

  • gmail.com
  • yahoo.com

Looking for IPv6 bridges?

Looking for obfsproxy bridges?

Specify transport by name:

Note for experts: if you can use IPv6, try upgrading to Tor 0.2.3.12 or newer and use these bridge lines:

  bridge [2001:948:7:2::163]:6001
  bridge [2600:3c01::f03c:91ff:fe93:d525]:9001
  bridge [2600:3c01::f03c:91ff:fe93:b8ee]:443

Let us know how it goes!

Download Obfsproxy Tor Browser Bundle

We’ve made an experimental package that currently works in all censored countries with no config changes.

Windows Obfsproxy Tor Browser Bundle (signature).

OSX (10.6 & 10.7) Obfsproxy Tor Browser Bundle (signature).

Linux 32-bit Obfsproxy Tor Browser Bundle (signature).

Linux 64-bit Obfsproxy Tor Browser Bundle (signature).

Installation Instructions

To set up an obfsproxy bridge, or to build it from source, see the separate Obfsproxy Installation Instructions page.

Obfsproxy Instructions

client torrc

Hey! Are you looking for the guide on how to set up an obfuscated bridge on a Debian system? Check this out.

Step 1: Install dependencies, obfsproxy, and Tor

You will need a C compiler (gcc), the autoconf and autotools build system, the git revision control system, pkg-config and libtool, libevent-2 and its headers, and the development headers of OpenSSL.

On Debian testing or Ubuntu oneiric, you could do:
# apt-get install autoconf autotools-dev gcc git pkg-config libtool libevent-2.0-5 libevent-dev libevent-openssl-2.0-5 libssl-dev

If you’re on a more stable Linux, you can either try our experimental backport libevent2 debs or build libevent2 from source.

Clone obfsproxy from its git repository:
$ git clone https://git.torproject.org/obfsproxy.git
The above command should create and populate a directory named ‘obfsproxy’ in your current directory.

Compile obfsproxy:
$ cd obfsproxy
$ ./autogen.sh && ./configure && make

Optionally, as root install obfsproxy in your system:
# make install

If you prefer not to install obfsproxy as root, you can instead just modify the Transport lines in your torrc file (explained below) to point to your obfsproxy binary.

You will need Tor 0.2.3.11-alpha or later.


Step 2a: If you’re the client…

First, you need to learn the address of a bridge that supports obfsproxy. If you don’t know any, try asking a friend to set one up for you. Then the appropriate lines to your tor configuration file:

UseBridges 1
Bridge obfs2 128.31.0.34:1051
ClientTransportPlugin obfs2 exec /usr/local/bin/obfsproxy --managed

Don’t forget to replace 128.31.0.34:1051 with the IP address and port that the bridge’s obfsproxy is listening on.

Congratulations! Your traffic should now be obfuscated by obfsproxy. You are done! You can now start using Tor.


Step 2b: If you’re the bridge…

Configure your Tor to be a bridge (e.g. by setting “ORPort 9001” and “BridgeRelay 1”). Then add this new line to your tor configuration file:

ServerTransportPlugin obfs2 exec /usr/local/bin/obfsproxy --managed

Launch Tor using this configuration file. You can do this by using your favorite init script, or by pointing the Tor binary to the torrc file:

spawn tor

Next, find the TCP port opened by obfsproxy. Look in your log file for a line similar to this one:
bridge torrc
The last number, in this case 34545, is the TCP port number that your clients should point their obfsproxy to.

Congratulations! Tell your clients to point their obfsproxy to your IP address and to port 34545.

from here